D-Scan
Index of Acronyms
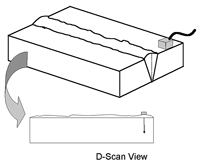
D-scan refers to the image produced when the data collected from an ultrasonic inspection is plotted on an end view of the component. The true definition according to BS EN 1330-4:2000 is the 'Image of the results of an ultrasonic examination showing a cross-section of the test object perpendicular to the scanning surface and perpendicular to the projection of the beam axis on the scanning surface'.

The D-scan view is perpendicular to both the C-scan and the B-scan. However, like the C-scan, the D-scan usually shows ultrasonic data collected through the whole or part of the inspection volume.
The D-scan allows quick discrimination of indications along a weld by presenting their position in depth from the scanning surface. D-scans are often used in the presentation and analysis of TOFD data.
For more information on how D-scans are used see:
S K Nath et al, 'Sizing of surface-breaking cracks in complex geometry components by ultrasonic Time-of-Flight Diffraction (TOFD) technique', Insight Vol 49 No 4, 200-206, April 2007.
What the hec?! articles are not intended to be the definitive account on the topic or acronym in question. Readers’ comments and contributions are welcomed. Email: ndtnews@bindt.org